FREE Crochet Pattern - Baby Yoda (The Child) from The Mandalorian

UPDATE 2/12/23: Cleaned up the pattern a little for readability and added a note about how I weirdly work BLO for no logical reason.
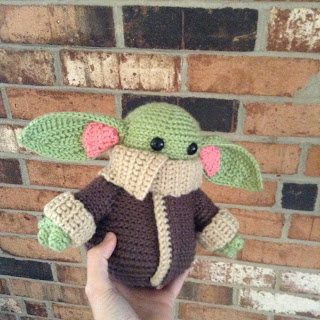
There are a million Baby Yoda patterns floating around and now there are a million and one because I wanted to make a bigger version in a simplified, derpy style. I figure this might also be up someone else's alley and hot damn it's the holidays so, of course, it's free (also the Mouse Detective is the most aggressive of the copyright police...I know from experience. lolz). Enjoy! Feel free to modify this pattern as you see fit, but link back here to share the joy and, you know, give me a little credit.
Mine turned out about 8" tall and 13" across at the widest point AKA the ears. I used Caron Simply Soft except for the light brown which is Radheart Supa Sava! Super Saver is a little thicker than Simply Soft and you want the collar and the cuffs to be a little chunkier. Heck, you can use the same color brown if you want. I used 10mm safety eyes, but you can do whatever. I also worked in back loops only, but if you've known me for a while, you know that's just a thing that I do. It is isn't necessary unless you want the same texture.
What You Need (Tools and Stuff)
- size F crochet hook (use a bigger one for a bigger Baby Yoda)
- worsted weight yarn in light green, light pink, two shades of brown
- tapestry needle
- 10mm safety eyes
- filling
Head
With light green.
- Ch 2;
- Rnd 1: work 7 sc into 2nd ch from hook (7);
- Rnd 2: inc around (14);
- Rnd 3: * sc, inc, repeat from * around (21);
- Rnd 4: * 2 sc, inc, repeat from * around (28);
- Rnd 5: * 3 sc, inc, repeat from * around (35);
- Rnd 6: * 4 sc, inc, repeat from * around (42);
- Rnd 7: sc around (42);
- Rnd 8: * 5 sc, inc, repeat from * around (49);
- Rnds 9-13: sc around (49);
- Rnd 14: * 5 sc, dec, repeat from * around (42), break off and leave long tail for joining.
Ears
Make 2,
With light green.
- Ch 21, turn;
- Row 1: sc in 2nd ch from hook, hdc, dc, tc until 3 st left, dc, hdc, sc, ch 1, turn;
- Row 2: skip 1st st, sl into 2nd, sc, hdc, dc across until 4 st left, hdc, sc, sl, ch 1, turn;
- Row 3: skip 1st, sl into 2nd, sc, 2 hdc, dc across until 5 left, 2 hdc, sc, sl, ch 1 turn;
- Row 4: skip 1st, sl into 2nd, 2 sc, hdc, dc across until 5 left, 2 hdc, sc, sl, ch 1 turn;
- Row 5: 3 sl, sc, hdc, dc, tc, dc, hdc, sc, sl all the way to corner where you started, ch 1, turn;
Finishing: sl around to create finished edge, break off.
Add some optional pink to the inner part of the ear (this
will also help the ears not flop around if you’re using a larger hook/making a
bigger Baby Yoda) with the following:
With light pink.
- Ch 5;
- Row 1: sc in 2nd ch from hook and across (4), ch 1, turn;
- Row 2: sc across, (4), ch 1, turn;
- Row 3: inc, sc across (5), ch 1 turn;
- Row 4: sc until 1 st remains, inc in final st (6), ch 1, turn;
- Row 5: sl, sc, 2 hdc, sc, sl, break off.
Stitch into place with the flat edge matching the flat edge
of the ear.
The ear needs to be folded a little and then joined to the
head. The flat edge is the top of the ear. It may take a few passes around to
get the ear secure and positioned.
Body
Starting at the bottom,
With darker brown.
- Ch 2;
- Rnd 1: work 7 sc into 2nd ch from hook (7);
- Rnd 2: inc around (14);
- Rnd 3: * sc, inc, repeat from * around (21);
- Rnd 4: * 2 sc, inc, repeat from * around (28);
- Rnd 5: * 3 sc, inc, repeat from * around (35);
- Rnd 6: * 4 sc, inc, repeat from * around (42);
- Rnd 7: * 5 sc, inc, repeat from * around (49);
- Rnd 8: * 6 sc, inc, repeat from * around (56);
- Rnd 9: * 7 sc, inc, repeat from * around (63);
- Rnd 10: * 8 sc, inc, repeat from * around (70);
- Rnds 11-13: sc around (70);
- Rnd 14: * 8 sc, dec, repeat from * around (63);
- Rnd 15: sc around (63);
- Rnd 16: * 7 sc, dec, repeat from * around (56);
- Rnd 17: sc around (56);
- Rnd 18: * 6 sc, dec, repeat from * around (49);
- Rnds 19-20: sc around (49);
- Rnd 21: * 5 sc, dec, repeat from * around (42);
- Rnds 22-26: sc around (42);
- Rnd 27: * 4 sc, dec, repeat from * around (35);
- Rnd 28: * 3 sc, dec, repeat from * around (28), break off, stuff to desired firmness;
Stuff and attach the head.
Collar
With lighter brown.
- Ch 13;
- Row 1: begin sc in 2nd ch from hook (12), ch 1, turn;
- Rows 2-42: sc across (12), ch 1, turn;
- Row 43: sc across (12), break off and leave long tail for attaching to body. Attach as shown then fold down.
Hands
You’re basically going to be making 2 tiny 3-fingered gloves.
With your green.
- Ch 19, sl to form loop;
- Rnds 1-3: sc around (18);
- 1st finger (here is when it might get confusing?): 3 sc, ch 2, then fold the piece such that the start of your rnds is one of the edges, join the ch to the other side and sc in what were the final 3 sts of the rnd (8);
- Rnds 2-3: sc around (8), break off and close the hole – I ran the tail through the loops of the stitches then cinched it shut;
- 2nd finger: rejoin the yarn in what would have been the 4th st of the original rnd, ch 1 (this is the 1st st of the finger), 2 sc, ch 2, join to the back side and sc in the next 3 sts before the 1st finger, 2 sc in the ch of the 1st finger (10);
- Rnds 2-3: sc around (10), break off and close;
- 3rd finger: regjoin yarn in 7th st of original rnd, ch 1, sc all the way around including into the ch of the 2nd finger (8);
- Rnds 2-3, sc around (8), break off and close.
Arms
Make 2, with darker brown, starting at the wrists, you are
going to attach these to the hands you just made and work up the arms away from
the hands.
- Rnd 1: ch 1 in the joining st, this counts as your 1st st, sc around (18);
- Rnds 2-5: sc around (18);
- Row 6: (this next part is going to be the shoulder - stop working in the rnd, start working flat) 9 sc (9), ch 1, turn;
- Row 7: 9 sc, (9), ch 1, turn
- Row 8: skip the 1st sc, 6 sc, dec across final 2 sts (7), ch 1, turn;
- Row 9: skip the 1st sc, 4 sc, dec across final 2 sts (5), break off and leave tail for joining to body.
Sleeve Cuff
- Ch 10, leave a tail of several inches;
- Row 1: begin sc in 2nd ch from hook (9), ch 1, turn;
- Rows 2-19: sc across (9), break off and leave a long tail.
- Seam the short sides together to make a ring then slide it over the arm and join it as shown. Make sure the seam of the cuff is on the back or underside of the arm. Fold it down to partially cover the hand. Stuff the arm.
Attach the shoulders to the body. The shoulder should be
partially under the collar when it is folded down.
Front Details
Begin with lighter brown, ch 22;
- Row 1: begin sc in 2nd ch and across (21), switch to darker brown, ch 1, turn;
- Row 2: sc across (21), ch 1, turn;
- Row 3: sc across (21), break off and leave a long tail stitch it up the middle of the body.
Done!
Go give my Facebook page a Like for the most current updates, free patterns, and stuff! If you like free patterns, you should check out my paid patterns and other goodies in my Etsy shop because I have bills to pay and habits to support.
Or you can just...
XOXOX and happy crafting!


Comments
Post a Comment