FREE and Super-Easy Wavy Blanket Crochet Pattern
UPDATE 2/11/23: Pattern still valid and good, just corrected some minor formatting. I must comment this here to know that I already looked at this pattern during the Great Blog Update of 2023.
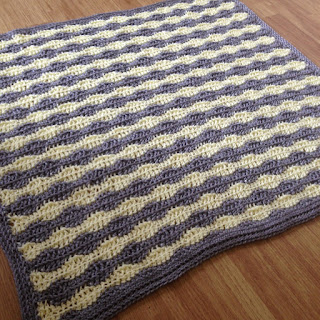
Need a fast, easy, and fun blanket pattern? This wavy blanket looks pretty snazzy with two contrasting colors, but it would also look great with three or more colors. Heck, do a gradient of colors. It's easy to customize a bit too by adding in treble crochets to make your waves taller if you want. There's a pattern on Moogly with a similar motif in smaller squares.
The blanket I made is baby blanket size and square, but you can make it whatever size you like. Seriously. Do what you want. Don't let a pattern rule your life. ;)
Anywho, let's get to blanket-making business!
I worked in BLO (back loop only)!
Materials and Stuff
- yarn in at least two colors (make sure each of your yarns is the same weight is my only caveat) - I used sport weight for this particular blanket
- a crochet hook that you like - I used my J hook for looser stitches
- ch: chain
- sc: single crochet
- hdc: half double crochet
- dc: double crochet
- sl: slip stitch
- fsc: foundation single crochet (optional)
Pattern
- Create a foundation with your desired number of stitches to obtain the width you want (before the border) with Color A - use either a good old ch foundation or you can do foundation sc if it's in your skill set;
-
 Row 1: in second ch from hook *3 sc, hdc, 3 dc, hdc, repeat from * across until you run out of stitches (it's seriously ok, just pay attention to the last type of stitch you made), turn;
 - Row 2: switch to Color B (and this may sound tricky, but it really isn't, and there's a chart below if you're a chart person), ch for the appropriate height of your first actual stitch, then dc in each sc in the previous row, hdc in each hdc, and sc in each dc across; you'll end this row with 3 dc if you started with 3 sc, ch 3 turn;
- Row 3: dc in each dc, hdc in each hdc, sc in each sc of the previous row, turn;
- Row 4: switch back to Color A and use the same rules from Row 2;
This isn't the most visually stunning chart, but hopefully it illustrates the pattern that is a little weird when I try to put it into words. lulz
For my border I did three rounds of sc with 2 ch in each corner, then a round of sl for finishing, but you can do whatever sort of border you like. Weave in any ends you have and you've got yourself a blanket!
PROTIP: I didn't break off my colors for my color changes. I loosely carried the unused yarn because I hate weaving in ends. I then grabbed the floating bits when I did my border and hid them in the stitches on the back of the blanket.


Comments
Post a Comment