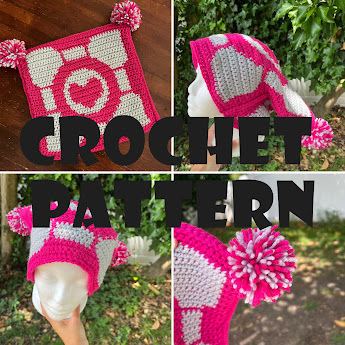
Portal Companion Cube Hat v2.0 (This would also make an awesome pillow!)
In lieu of this month's pattern roundup, I decided to unleash this FREE crochet pattern! I got a little spicy in last month's roundup (and not spicy in a good way), so I'm changing things up this month. Because I can. I do what I want. This is my blog. This is more fun anyway?
If you want a PDF copy of this pattern, without ads, and without all of these extra words, you can snag it here. It's a pay-what-you-want as long as what you want is within reason. Patterns take days to make. Even remaking an old pattern. It's a lot. A lot goes into all of this. If you don't want to pay for it, you get ads and me being unhinged on my blog. That's the price.
This is actually based on one of my very old patterns. And listen here: I was going to do it in mosaic crochet, but then I changed my mind...for reasons. I do plan on doing a mosaic crochet-specific pattern and tutorials for the two types of mosaic crochet as (hopefully sooner rather than later - maybe for next month). The original companion cube pattern still holds up and you can find it here. My patterning and crochet skills have improved a great deal since ye olde 2015 and I felt like I could make this a little better, and at the same time make the pattern more simple than the original. Take a look at both and pick whichever version you like the most!
This pattern will absolutely work for a pillow as well, but you'll need to seam all four sides closed or use buttons or a zipper on one side if you want to make it into a removable pillow cover/sham. You can adjust your gauge to work it around a store-bought square pillow or you can just seam all four sides and stuff it as previously mentioned. Personally, I like making pillow shams for existing pillows. Like, if you have an ugly old throw pillow you want to spruce up, you know?
I used a US size J hook and ended up with a gauge of about 3sc/inch and 2 sc rows/inch, which resulted in a hat that was about 12" across and 12" tall, excluding the corner pom poms. So it's a big, goofy, fun hat.
This version of the hat, like the original, is made with tapestry single crochet. If you aren't familiar with tapestry crochet and you're interested in a video, you can find one here. I think tapestry crochet is easier in the round than when working flat as it involves a lot of moving your yarn from the front to the back and vice versa.
If you'd like to use this pattern for a different technique such as c2c crochet then go right ahead! It should work just fine. By all means, get creative! You also don't have to use this for a hat or a pillow if you have another idea. Do what you want with this chart! I just want to provide tools and suggestions for people to use creatively.
Anyway, let's get on with this hat.
Tools and Materials
- size J crochet hook (or whatever size for desired gauge of project)
- worsted weight yarn in 2 colors, referred to as background (BG) and contrasting color (CC)
- yarn needle (optional)
- 3" pom pom maker
Skills Needed (and abbreviations)
- ch: chain
- sl: slip stitch
- sc: single crochet
- sc tapestry crochet - and guess what?! I made a video demonstrating how to do this on both sides of the panel.
Pattern
Make 2.
Ch 41 with BG;
Begin the 1st row in the 2nd ch from your hook, ch 1, turn at the end of every row;
When you reach the 3rd row, join CC and begin working the colorwork. If you somehow missed it, there's a video here.
*You can absolutely save this pattern and scale it if you need to. I will never block right-clicking, I promise - even if people steal all my shit and never give me credit.
Tip: If you're making this as a pillow sham then you can easily add more length/girth by working more rnds of this edging if necessary to make it fit an existing pillow. You could even do it in your CC yarn to mix things up. As always, get creative! I intend for my patterns to be starting points and inspiration!
To join the two panels, whether making a hat or a pillow, place them together with the back sides facing each other and sc the sides and top (for a hat) with BG. For a pillow, you may consider sewing the panels with a yarn needle. I made another video!
Weave in your ends!
Make pom poms or tassels for the corners for some flair. Put them on the top corners for a hat, and you can absolutely add them to every corner for a super-fun companion cube throw pillow!
If you enjoyed this pattern and you'd like to see more free patterns from me in the future then you can support me on Ko-Fi! Be sure to check out my monthly membership options and of course my large selection of paid patterns! If you're interested in physical inventory then head to my Etsy shop. For updates, follow me on Facebook!
Happy crafting!
bangbangkisskiss


Comments
Post a Comment